Tuesday, 17 April 2012

Family Canvas

I don't normally blog my scrapbook type projects but thought I'd like to share this canvas I made for my Mum's birthday last November:


The base canvas was from a workshop I did a few years ago and I was never happy with the results so when bits started falling off it I completely dismantled it and started again! Recycling at its best! I covered the canvas with pieces of serviettes using gel medium, chose some recent piccies of my girls (and Grandma and Granddad) which I matted onto black card, painted some chipboard letters and a smaller canvas board in green patina eco-green paint, added a couple of charms and ribbons and the canvas was done - the most time consuming bit was deciding how to arrange the bits - quite a quick, cheap and easy project but my mum was over the moon with it! Hope you like it.  JulieD x

ps if you look hard enough you'll see the whole family dressed as Tudors on a National Trust day out last year!! My hubby gives a good Lord Melchett impression ...

Sunday, 8 April 2012

Fran-tage It!!!

I've not blogged for a few weeks so that's my justification for such a long post...

On a 'works trip' to Stitches trade show in Feb with Gwen, I was mesmerised watching Fran Seiford of Stampendous demoing her fabulous Fran-tage range - apparently it's Fran for, well, Fran and tage as in vinTAGE, and it's a range of gorgeous powders and flakes - textured embossing powder, crushed glass glitter, mica flakes, shaved ice, matt fragments - an array of loveliness! I managed to talk Gwen into buying a load of their products to stock in the shop (The Stamp Pad) including some lovely stamps as well as the messy stuff! Anyway, Fran did me a sample to bring away and this is it:


She calls this sprinkling of lots of the products in a random way Encrusted Jewel Technique - basically you sprinkle on your embossing powders first then add other texture and colour in the form of the glitters, flakes etc and when you heat it (from below otherwise you get it up your nose!!!) the powder melts and the other bits are secured in the molten embossing powder - you don't use any ink or glue, just sprinkle it straight onto the card - this seemed wrong at first! I'm addicted and as we had a shelf full of the stuff at the shop, I thought it only polite to do something with it so I offered to run a workshop!

We did three sessions and these are the samples of the pieces we did:


A nice simple tag using the Stampendous Daffodil stamp embossed in the Shabby White embossing powder and Encrusted Jewel using Aged Taupe powder plus the bronze and green Crushed Glass Glitter. I coloured parts of the image with chalk.

This second one uses my favourite of their stamps - I think it's called Three Gifts:


I piled some other products onto this tag to create 'treasure' - including the mica flakes, shaved ice and fragments as well as the powders and glitters used on the Daffodil tag.

We then got a bit more advanced and used one of Fran's other techniques - coffee spritzing! This piece is based on a sample Fran does on a video she has on YouTube - we had the stamp in stock so I thought I'd have a go:


Same products but I did the background by spritzing the card with black coffee in a spray, then sprinkling instant coffee granules onto the wet patches and spritzing again - I dabbed off a little of the coffee then heated until the coffee bubbled and dried! The Encrusted Jewel part was done in exactly the same way as before. Once they'd tried out the technique a few times, I thought the workshop participants could do a finished piece so we did this canvas:


I was glad I'd prepped a sample a couple of days before I had the first session as I hadn't considered the thickness of this canvas board and the fact that I had to heat from below - it worked eventually but it took the best part of an hour and my wrist was aching a lot! The second attempt was done in the oven and it worked perfectly - remember to consider where the fan is if you do this in a fan oven as otherwise your oven will be wearing it!! I sprayed the ready gessoed canvas panel with three colours of Ranger Colour Wash and dried it with my heat tool (which all reacted with the gesso and went much paler - serendipity as the colours were much more vintage looking). I then stamped and roughly cut out the frame and placed it as a mask on the canvas to give an idea of where to sprinkle - I then did the sprinkling and put it in the oven at 140! Once the powders had melted and the canvas had cooled down, I finished off with the stamped and embossed frame, cameo, the stamped and embossed corners (using the flourish from the frame) and embossed the edges by versamarking and dipping each edge into a line of powder in the fold of a piece of paper.  I hope you like my samples - all products including the stamps are available here!

Enjoy the rest of the Easter Weekend. JulieD x

Friday, 23 March 2012

Blogging IndigoBlu

I've not blogged for ages - been far too busy making samples for IndigoBlu and prepping workshops for The Stamp Pad (new workshop list available!) I can't remember the last time I did any crafting that wasn't for one of those causes but I'm having a day out crafting tomorrow and doing whatever I fancy!! I'm going to a Craft Day at the Stamp Pad - "Complete A UFO" - I was expecting a rude answer when I asked Gwen what it stood for but apparently it's 'Unfinished Object' - so a bit like a crop but take a project you've been meaning to complete and GET ON WITH IT!!! I've got dozens of things I could take ...

Anyway, I blogged two of my samples on the IndigoBlu blog which I created for the Create and Craft show on Wednesday - they didn't get much of an airing - they were on a stand next to the presenter but you can see them here!

I thought I'd show you the two samples I did using the T'wit T'woo stamp as well - it's a beautiful big owl stamp - my next idea is to shrink it, I think it would look great in shrink plastic!

This is the first one:


I stamped him onto white card and embossed him in black then painted him with a variety of brown distress inks and a touch of gold mica powder. The black panel behind him is a die cut Vintage Cabinet Card (using an Alteration's die I bought a couple of weeks ago and now I don't know how I lived without it!!) which I've stamped with the Script stamp in Versamark and clear embossed. For the rust coloured panel I've used the Crackleglaze stamp and the word panel is stamped with the burlap and the word Inspire - both from the Sarah's choice plate. I used two more Alterations dies for the branches - the one he's perched on is the Branch Tree die on its side and the side of the tree is an on the edge die - Twigs!

This is my second T'wit T'woo piece which was shown on Wednesday:


I stamped and coloured the owl in the same way as the first piece but masked him and overstamped with the Jack stamp in FlitterGlu then gilded with Morris Dance flake. I used a piece of corrugated card from an old box (one of my favourite crafting items at the moment!) a chunk of Core-dinations card which I stamped and embossed the words from the Pomp and Pageantry plate onto, then added the butterfly from the Wild Meadow plate.

Hope you like them and enjoy your weekend!

JulieD x

Monday, 27 February 2012

Discover Your Passion

That's the name of one of the new releases from IndigoBlu which I've been playing with for the last couple of weeks - they are beautiful designs and I've enjoyed working with them. I created the following two cards for the Stitches trade show and they were real quickies as I only got my hands on the stamps on Monday night and needed to send the samples by Thursday!! They were slightly different by the time I sent them as I added ribbon down the left side of the card and gems to the corners literally on my way to the post office (I stopped in at the Stamp Pad for the final touches!!) - they were up on the wall when we visited Kay on her stand which was a real thrill for me!!


For this second card I used my distress inks to colour my card background and the top panel with the quote on. Next, I stamped the flourish onto the background using VersaMark - I pounced on a copper coloured mica powder then stamped the two word stamps in FlitterGlu, gilding with MegaFlake. I stamped the dragonfly from the same plate onto grungeboard with Archival black, got hubby to cut out (not my strong point and he's a whizz with a scalpel!!) and added a charm!


This second creation has a sprayed background (ColourWash) and a gilded flourish. The butterfly is again grungeboard which is cut out and inked.

Thanks for stopping by! JulieD


Sunday, 26 February 2012

Memories Canvas

I came up with the idea for this canvas months ago for a challenge on Grungy Monday relating to remembering those we've lost, but the idea got bigger and bigger and it's taken me til now to add all the finishing touches.


I covered the 12" box canvas with 7Gypsies printed tissue paper, then added a photo of my grandparents' wedding plus lots of little details which remind me of them - they both died before I was ten so my bank of memories isn't huge but I do remember particular moments and items quite vividly. Some of the embellishments which signify particular memories include: a crown as my Nana was a Royalist; a clock mechanism as my Granddad bought me my first watch when I learnt to tell the time; a teapot as they used loose leaf tea in a pot; a rose charm as I used to make rose petal 'perfume' in jam jars in their garden; buttons as I remember my Nana's button jar (she was a hoarder like me!); a bird charm as I remember watching goldfinches in their garden through the window.

The flowers are die cut with the Tattered Florals die from Glassine paper then scrunched, inked and layered up, the trim has been coloured with Distress Stain and the words are die cut, inked Grungeboard at the bottom and TH Salvage Stickers on GB blocks at the top.

It's quite a personal piece and I've added a tag which slips in behind the photo with all this info on to refer to in later years!

Enjoy! JulieD x  

Saturday, 25 February 2012

IndigoBlu - Stitches Samples

I'm not good at this blogging lark am I? I must get more organised and make some time to post ...

I've recently done eight samples for IndigoBlu for the Create and Craft show tomorrow but I'm saving them for next week's blogfest - two are from a new plate which hasn't been seen by the general public yet so I'm under oath not to post those until after the show!!!

However, I did some samples for Kay to display on her stand at Stitches last week - on this occasion, I could use any stamps from her range for two of the pieces so I thought I'd share them today!


I've stamped with the Harlequin on the background with Champagne Encore ink then stamped over with Script in Black Archival. The Map has been stamped in FlitterGlu on black gloss card then gilded with Morris Dance flake. I embossed the quote (from Wild Meadow) with gold embossing powder. I'm not a fan of punches but I treated myself to the Martha Stewart punch you can see under the bird charm then left it in the box for a year - I got it out and used it for the first time on this card and it's really lovely, I might have to change my view on punches!!!


Not a great photo - you can see the camera reflected if you look hard enough ...  I gilded EllaBella on black card then stamped her onto acetate at an angle using black Staz-On and overlaid them, alcohol inked the edges then attached with brads, added a violin charm and a row of flourishes - simples!!

Hope you like them - look out for Kay (and a few more of my creations) on C&C tomorrow! I'm off to the Stamp Pad to treat myself to some of the goodies we ordered at Stitches last week - the Mica Flakes and Colour Fragments from Stampendous which we saw Fran demoing and I fell in love with - it would be rude not to buy some after talking Gwen into ordering them really...

JulieD x

Sunday, 5 February 2012

My Drawers!

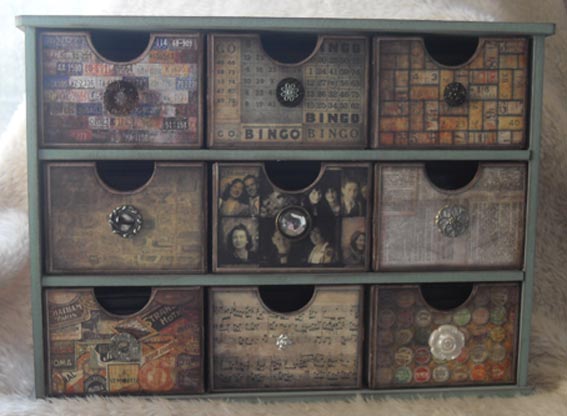
Having got out of the habit of blogging recently, I thought I'd get some of my many projects on! Last year for my 40th birthday, my friends and I had a Spa and Craft Weekend in Frodsham. I could choose from a number of projects for the craft workshop and requested the Kaisercraft 9 Drawer unit which I'd had my eye on for a while - the day was fab, we had a great time but I decided I wasn't too keen on the papers we were given to cover the drawers with so completed the project at home with my Tim Holtz papers, distress inks and fancy buttons! Here's the finished article:


I love it! Until the new limited edition colours arrived, it fitted my distress ink pads exactly as each drawer holds four inkpads and four sponges perfectly - even with my terrible maths I know that accommodated the 36 colours!!


My mum came on my birthday weekend too and as a non-crafter (she was more interested in the spa and wine...) she decided she would never finish her set of drawers so I'm now working on a second ...

Hope you like it!

JulieD